Posts Tagged ‘amigo’

Things have been uncharacteristically quiet around The Scuderia recently.  I’ve had a few distractions that derailed my plans for a while.

I spent a few weeks chasing a new property with great workshop facilities but that came to nought.  So after much grumbling and feeling sorry for myself I’m resigned to soldiering on where I am.  It’s far from ideal but at least it won’t put me in the Workhouse.

After pulling myself together but before I could get back to work, I succumbed to the dreaded Fresher’s Flu.  One of the pitfalls of working at a University is that every year thousands of new students arrive from all over the world to pour all their varied and assorted strains of “The Dreaded Lurgy” into a melting pot, to be liberally distributed amongst people who have not yet had opportunity to build immunity to their particular brand of unclean.  The fever has subsided but the cough and runny nose persists but onward I must go.

I have a lot to get on with too.  I’ve got some woodworking to do to help a friend out.  There are five cars outside that all need a service.  I’ve got plenty of work to do on my project cars.  And I’ve decided to make some panels to sell too.

Watch this space!

Well I’ve reached a milestone, even if I’m not enjoying the warm fuzzy feeling of self satisfaction associated with knowing that a project is finished.  I’ve got Pandora water tight and the glass is back in the hole.

This chapter is not finished though, for a couple of reasons. Firstly, the weather is changing and the nights are drawing in. Secondly, with the project dragging on for most of the summer, I’ve REALLY pissed off my neighbours with the incessant noise of hammering, grinding and sawing.  I absolutely couldn’t afford to metal finish the new panels without serious risk of a letter from the local authorities!  So making the bare minimum of noise I got the panels near to finished shape and sealed it all up for the winter.  It’s now water tight and I can sleep at night again without worrying that it’s dissolving faster than I could rebuild it!

This slideshow requires JavaScript.

I re-enforced both the roof where the hinges fit and pop-top, inserting rivnuts to provide more strength than the original pop rivets. Fastening the hinges to the roof with countersunk stainless steel socket headed bolts and to the pop top with the round headed variety.  It’s neater, stronger and I can remove them easily for maintenance.

The window rubbers are a mess though.  They’re hard and brittle, have been savaged with a grinder and someone in the past has cut them, probably because they thought it would make them easier to fit (wrong!).  Now they’ve shrunk and don’t meet at the join by a long shot.  Sourcing new ones is going to be interesting.

Back to the Spider for a while now and Pandora will have to wait her turn in the workshop to (metal) finish what I’ve started.  I’ll be keeping an eye on the property pages too.  Looking for a property that I can work from….

I’ve been pushing hard to get Pandora’s window frames grafted in before the inevitable bad weather.  I’m almost there now.  The frames are in and there is just a bit of metal finishing to do before I can get a coat of zinc primer on and put the windows back in.  I will still have everything below the waist line to repair before it gets painted properly but that’s not so urgent now that the thing is not filling up with water every time it rains.

To complete the internal structure I needed to clamp the components together in a confined space where welding clamps won’t fit.  I wandered down to Machine Mart in my lunch break on Friday and found some funky little clamps that were just the ticket.  I think I’ll get a lot of use out of them.

With the top rail holding the roof together I finally got to cut out the timber that was fitted between the main hoops of the structure.  Back in 1979 when Pandora was born, having two pieces of inch and a half square timber to attach your interior trim to was probably considered to be fine.  Of course if you get arse ended they’ll splinter and likely go straight through the drivers back!  So I’ve had ‘em out a bit sharpish.  I’ll fabricate some steel box sections and weld them in securely instead.

The window frames were a challenge.  Surprisingly they fitted a treat but there isn’t a lot of room to get in behind them and weld them in invisibly. Not to mention the question of a 3 foot butt weld in a very visible place along the side panel. On the middle window there was even some patching of the bead feature to do for good measure.  It took a lot of patience to TIG weld it all together, especially as it was sporadically blowing a gale too…winter is definitely coming!  I think it will all planish to a good, filler free finish though despite the odd blow hole to fix when the wind robbed me of Argon shield.  By the end of the week it will be primed and the window back in.  Then I can give my neighbours ears a rest.  Bless ‘em. I can’t believe I’ve not had a letter from the council yet!

This slideshow requires JavaScript.

As the actress said to the Bishop.

The structural rebuild of Pandora’s roof is taking longer than I expected.  It’s all still going to plan but progress is steady.  I cut away the structure over the drivers door, despite this being on the whole pretty sound because I wanted to run the new structure from front to rear instead of having all the joints at the B pillar.  I retained the original B pillar but peeled it back to gain access to the top where I replaced the capping piece.  This and the new box section structure was spot welded to the lip on the roof.  The roof rails welded to the pillar and the skin refitted.

The new gutter channel was then spot welded to the underside of the lip and to the new structure, giving a triple skin at the roof lip and two rows of welds holding it all together.  I had to shrink a curve at the back of the gutter to fit the rear quarter.  The rail is extremely strong now, everywhere that was welded originally is welded again and I intend to tidy up some of the rivet holes left previously with TIG brazing and also use this technique to weather seal some strategic areas to prevent future ingress of water.  The new window frames fit pretty accurately so there is just a bit of trimming to do and they can go in.

All I need is for the weather to hold out for a few more days….

This slideshow requires JavaScript.

I cut the side out of the van the other day and started to repair the horror story within.  The windows were pretty easy to cut away but the structure around the A, B and C pillars is a little more testing.  I’m trying to separate the roof from the pillars without damaging either by cutting out the rotten section between.  It’s pretty tight around the tops of each pillar and it’s like pulling teeth!.

It remains to be seen if I’ll be able to get my spot welder arms in to some of the places I need to but despite being painfully slow going, it is going to plan.

This slideshow requires JavaScript.

This weeks project has been to make a replacement sill or as our friends across the Atlantic would say “rocker panel”.  I’ve never really understood that but there you go, two nations divided by a common language.

I have never seen a replacement sill for sale either in the UK or Italy.  The ones I’ve got are patches on top of patches on top of gobbo.  So I scoured my manuals and pictures on the internet.  Eventually I found a nice engineering drawing of the van from the side and it became apparent that the sill is essentially symmetrical, which rather pleased me because it means that one pattern fits both sides.  Jules and I took some measurements and made some sketches, then it was on to a paper pattern and transferred to metal.

I had to pay particular attention to the order of operations, as ever some processes would make others impossible.  So first I wheeled a crown over the entire panel. Then transferred the features from the pattern and bent the bottom lip up.  These two operations gave the sheet of steel enough form to become rigid enough to handle more easily.

Next task…create the feature line about 40mm from the top bend.  This gave me more grief than i expected.  My cheap Chinese bead roller has never been particularly easy to drive.  It’s always had a mind of it’s own and marred the work.  It wasn’t any different this time!  I needed to do a bit more modification to it.  I filed the sharp edges from the dies.  God I wish I had a lathe!  And made a guide fence to ensure the lines remained straight.  Eventually I recovered the situation.  The marring isn’t too bad considering the panel will be protected with stone chip coating.   The other side will not be a problem when I make it, the bead roller works nicely now.

The top lip was bent, as the bottom was over a long piece of steel angle. and the front and rear flanges I threw with an old adjustable spanner.  To create the curve I used a combination of shrinking the flanges and wheeling with a rubber tyre.  I marked it up to gimp some drain channels in the bottom edge but changed my mind at the last minute.  The inner sills are sure to be bolloxed too, so I’ll put the drains in the new ones of those so they are invisible to the passing world.  I’m chuffed with the result and can’t wait to make one for the other side.

This slideshow requires JavaScript.

When I strip the interior out of Pandora to fit the new windows and roof structure i want to tackle the sills and wheel arches at the same time.  So I’ve started to make the parts for these too.

Today I’ve made a wheel arch repair.  It’s not quite finished as it needs some final dressing and the flanges turning where it joins to the adjacent panels.  I’ll have to do this last bit once I have the old metalwork cut out.

As with so many jobs the starting point was to make an FSP. This gave me a cutting pattern and allowed me to transfer the feature lines onto the steel sheet which I’d wheeled all over to form a slight crown.  Using the lines as a guide I leathered seven bells out of the flared portion of the arch on the sandbag with a bossing mallet.  Alternating between the bossing mallet and the English Wheel to get a smooth flare of the right size.  Then I turned a lip with the MKI Lipping Tool I made for the Spider arch a few weeks back.  It’s taken about 8 hours and there’s another hour of dressing to do when I fit it but I’m pretty happy with the result…

This slideshow requires JavaScript.

I’ve been steadily plugging away at making the pieces to fix the roof and windows on the Amigo.  I’m pretty much there now.

So that’s:DSCF1666

12 feet of inner trim panel – Check

10 feet of new gutter channel – Check

9 feet of roof rail section – Check

Two new window frames – Check

All I need now are some minerals.  By that of course I mean the “stones” required to go ahead and cut the entire side out of my van!

It’s taken a lot of thought and a great deal of work but I’ve produced my first window frame for Pandora.  In a previous post I showed you the hammer form I created for flow forming the sides of the window frame.  Here’s how I used it.

I cut a suitably sized blank out of 1mm steel sheet and folded a half inch lip along the edge.  This was to give me a fixed datum line that would not move when I started forming the shape.  I used the Lancaster Shrinker to create the general profile of the panel by shrinking the lip.  Once it matched my profile gauge I clamped it to the hammer form which acts as the die.

Flow Forming can require a pretty elaborate “die” but when you have to make a number of matching components the ROI is worth it.  I have three window frames to make as well as a tailgate skin which all use the same components.  You should really use a high quality air rivet gun to do the forming but they are expensive and I can’t justify the expense right now.  I used my air chisel which is a very crude implement in comparison.  Crude but effective!  I bought a couple of riveting heads for it. One in nylon, one in aluminium and one brass.  The nylon head allows the shape to form without bruising the metal and the alloy one can be used to crisp up the edge features once formed.  In the corners a little stretching was needed and on the straights a little shrinking.  In a short time one side was done.  Wash, rinse and repeat for the other side and I had a matching pair.

This would make a very small window, ideal for firing arrows out of but I wanted something bigger!  So I had to make a top and bottom edge.  Initially I made a curved die for the metal folder by welding a bar of the right diameter to a piece of flat stock.  It wasn’t a great success and I ended up with all sorts of steel clamped together in the vice to produce the right radius on my folds.  As my old Dad always says, there must be an easier way to do this.

Eventually I had a form that matched and using a hardboard template made from the original window I lined up the sections and measured and measured again before making the cuts to butt weld them together.  Break out the TIG and cue much welding grinding and dressing before the final fold along the top edge.  Then all that was needed was a little finessing with the shrinker to make sure the rails were straight et voila!

Hopefully each successive one will get easier!

This slideshow requires JavaScript.

I have some pretty elaborate repairs to conduct on Pandora.  I need to fabricate rear wheel arch repairs but more pressingly right now I need to fix the roof and gutter rails.  The water leaking in through the gutters has rusted the window frame away and they are pretty difficult to obtain at any price.  So I’ve been working on a way to reproduce them myself.

Rather conveniently FIAT saw fit to make all of the side windows identical, so any solution is universal.  With this in mind I chose to invest more in the means to reproduce the shapes needed.  Making a panel this size in one go is a tall order.  Firstly there is the issue of handling something that large when you work alone in a confined space, despite being only three feet by two and a bit this is still ever a pain.  Then there is the concern that with so much detail to form you could ruin a lot of work with one slip up on the home straight.  Finally there is the financial concern about potentially wasting a lot of steel cut out of the middle of the panel. So I opted to make the panel in sections and weld them together at the end.

I wanted to keep the welds to a minimum and make discreet sections that minimised the risk of waste.  I worked out that the sides would be the most difficult to make and the top and bottom would be quite simple folded channels.  The top and bottom rails are actually longer than my folder, so I had to buy a longer one.

The best way I could think of to form the sides was with a hammer form, using a technique known as Flowforming.  I replicated the main features using steel bar welded to some 2mm plate, fleshed out with body filler and all screwed to a sturdy piece of plywood. It was a good days work to make. Let’s hope it was worth the investment…

This slideshow requires JavaScript.

It’s monsoon season here in middle England.  June is usually characterised by rain that Terry Pratchett might describe as “like the sea, cut into vertical strips”.  It’s made me address a problem with Pandora that has been weighing on my mind since we got her.  DSCF1601

Where the pop-top hinges on the roof, the rear hinge has popped all the spot welds and pulled the roof off the side of the van.  When I stripped out the interior I could see why.  The frame has been repaired cosmetically but the structure inside the roof rail has been cut away and not replaced.

As a result any rain that falls on the van runs into the gutter rail and straight inside the van.

DSCF1598

The water has been trapped by the hardboard window surround and has rotted the window frame.  So I’m planning to repair the whole structure and make new window frames.

A hammer form seems like a good idea for the window frame and the internal structure is a folded box section.  Trouble is the windows are 3 feet long and my metal folder is only 2 feet long…. Mmmmm…Dilemma.

I have been sorting some of the pictures I’ve taken during the course of this years work and I’ve come across a few that I never posted at the time I took them.  Here are a few of the rear quarter structure of the 900.

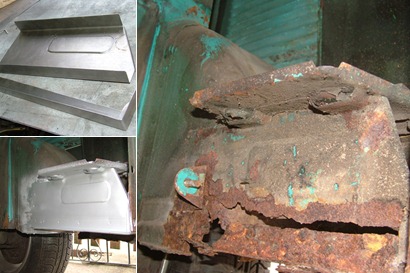
When I repaired the cross member there was nothing to hang it back onto.  I had to effect a temporary repair to the structure which holds the battery tray and mounts the rear cross member before putting it back together.  I made up some repair panels which were a close approximation of the originals but didn’t really go to town because I’m going to have to cut these off again when I rebuild the rear structure and fit the valance corners I’ve just created.

Some times that just the way the chassis crumbles.

I now have a matching pair of rear valance quarters.DSCF1308

It didn’t take quite as long to produce the second one and I learned a few more lessons along the way.  I have already started planning the next panels.  Wheel tubs all round!

Now where is that cling film and expandy foam?

With about 20 hours labour in it and consultancy fee from some of the finest metal shapers in the world, this should be the most expensive rear valance corner in the world!

Hopefully the other side won’t take as long now I know what I’m doing…but don’t hold your breathe 😉

This slideshow requires JavaScript.

I’ve made some more progress with my current project and I’m pretty pleased with the results so far despite nearly making a complete cock up of it.  It appears that my tucker is rather more effective than I’d anticipated and I’d well and truly over shrunk my piece in a couple of places.  After seeking advice from the elders on the “All Metal DSCF1269Shaping”  forum I got back on track. Those guys are some real heroes.

I developed the right profile by a mixture of stretching the upper part of the panel and shrinking the lower part. Deeper into the panel than the tucker would go, so I used my Shrinky Dink.  It’s a donut made from high density plastic (in this case a skateboard wheel).  By hammering the domed material over the donut dolly you achieve a staggering amount of shrinkage.  I stretched the upper portion with a mallet on a sandbag and wheeled to a nice smooth profile, a cardboard profile gauge made from the original panel showing me when I’d got it right.  When the profile was somewhere near I used the FSP I made earlier to fine tune the shape.  By placing the FSP on the work and smoothing it over the contours you can feel when the shape is right.  Too high and the pattern will be held off the surface of the panel, too low and the FSP is slack over the surface.

Once the shape was pretty close I set about turning the flanges.  First by marking the line from the FSP, then forming a crease with my improvised tipping wheel (another skate wheel).  I used the Lancaster shrinker to shrink the flange to achieve the correct profile, turning the flange as I shrunk it.  True to form I got carried away and over shrunk it. D’Oh!  By marking the profile of the original on the workbench I had a shape to work to and after an hour of hammering it was looking pretty good.

This slideshow requires JavaScript.

Without the shrinking mistakes I’d have had it finished today but alas you don’t learn anything by getting it right first time…. It would be nice though.

The bottoms of Pandora’s doors are almost entirely made of filler.  That in itself is not the end of the world because like Steve Austin, we can rebuild it! (Yeah, you children of the 70’s know who I mean).

It’s not so easy to rebuild them when you have no idea what they are supposed to look like though. So a couple of weeks ago I posted a cry for help on the FIAT forum in the hopes that the owner of another of these rare old beasts would be good enough to photograph their own doors and send them to me.HPIM03112

My prayers were answered by the “Citivantastic” Neil Vincent.  Neil not only provided me with pictures of the outside of the doors but, having a door with the skin cut away, was able to provide a valuable insight into the internal features too.  Strengthening ribs, skin flanges, water drains et al!  Thanks Neil, you are a star.

Neil is restoring his own Citivan. A much taller order than most campers because commercial vehicles rarely got the loving attention lavished on them that a member of the family like Pandora has.  Take a look at his handywork so far on this forum post and see what a brave restoration he has taken on!

Keep up the great work Neil and shout up if you ever need help Winking smile

Had a jolly (for want of a better word) to Bradford at the weekend and picked up the Sport box for Pandora. Also got an alternator and new set of rear drums from a very nice chap who has been collecting 900 bits for years.

Got a spare engine cover and tailgate in reasonable nick.  They will need some work but having a spare is always good.

I’m trying to keep a close eye on his forthcoming auctions, when eBay plays ball!  I might be going back for more 😉

I’ve just won an 850 Sport gearbox on the bay of E.  Closer ratio’s and a higher final drive should make the driving experience a lot more pleasant.  I had intended to work out the theoretical road speeds in comparison to the “commercial vehicle” ratio’s in the van box before making a purchase but when the auction came up I had to snap it up!

The upshot is that I can probably now live with the low profile tyres the previous owner fitted and still manage a 60mph cruising speed.  Now somewhere in the loft I have a set of X1/9 wheels……

One of the biggest jobs I had to undertake before venturing out in Pandora was to repair the rear crossmember. This was in a shocking state for a vehicle with a current MOT!

Have a look at the work involved in restoring it here.

Road Trip

Posted: September 19, 2011 in Amigo
Tags: , , , , , , , , ,

Pandora is back from her 450 mile road trip.  She never missed a beat and nothing important fell off.  Pitching her up satisfied my sense of comedy proportions too.

This slideshow requires JavaScript.

She made lots of new friends at Goodwood.  Everywhere you go people smile, wave, take pictures and come over to ask about her.