Archive for the ‘Tools’ Category

One of the perennial problems of working alone is that you never have enough hands.  Something as simple as clamping two pieces of work can be a real frustration, especially if you’ve spent ages lining everything up and then when you reach for the Vise-Grips they aren’t set to the correct tension.  Do you let go of the work? Try to hold the grips under your arm to tweak the adjuster with your free hand?  Hold them by the adjuster and try to swirl them around? Invariably whatever you do you don’t get the tension right first time… You know the drill.

So when I popped into my local Mole store to pick up some cat food (I always have a trip down the tool isle) I found something quite interesting.  A set of self adjusting Mole Grips!

Hanson Automatic Grips

These Hanson brand grips seem well made and use a locking cam system to achieve the automatic adjustment. I don’t imagine for one minute they will achieve the same pressure as my Vise-Grips but if they will hold everything in place whilst you get some extra grips onto the work then they have to be worth a try.

I’ll let you know how we get on together over the coming months….

The original tank is formed of two half-shells, resistance welded in a continuous bead around the perimeter of adjacent flanges.  There are a couple of simple baffles inside to prevent fuel surge along with a matching male and female indentation for the pick-up point and sender unit respectively.  I initially considered making a replica of this arrangement for my replacement but soon realised, as I visualised the construction process in my mind that this design would be difficult to realise with the tools I have available.  There were clearly design elements I must adopt but with something as critical as a petrol tank I couldn’t afford to take any chances, so I revised my design to allow me to form it without risk of compromise.  I also opted to increase the capacity of the tank by about a gallon by increasing it’s width. It’s not a very big tank and an extra 35 miles range, give or take is not to be sniffed at.

I opted to make the tank shell in 3 pieces; two end panels with a single skin wrapped around them rather like a barrel.  The baffles would be two panels of similar form to the ends joined by two transverse panels.  By assembling the baffles first the tanks skin would wrap around all of the vertical members and join at the top where the likelihood of leakage is lowest.  The end panels could be removed, granting access to secure the baffle system with spot welds (something the original “shell” design wouldn’t permit), then replaced and welded into place.

View albumView albumView albumView albumView album

Using a standard sender/pick up unit was essential, so the two indentations were a necessity.  To create these I opted to use a Hammer form.  I formed an elaborate device I call The Pixie’s Toilet Seat (you’ll see why) from some scrap timber and a T-hinge which was ultimately destined to hold up my new garden gate.  No wastage here!  The pixie’s toilet seat allowed me to hold two concentric circles in register to each other.  By clamping steel sheet in between I could hammer a circular indentation with clearly defined inner and outer diameters.  A test run proved that quite a lot of pre-stretching was required, which I achieved with hammer and dolly and English wheel. The end panels and baffles were also created using a simple hammer form consisting of two pieces of scrap plywood.

Next installment…I start bashing tin!

CabinetI’m about 2/3rds of the way through making a new petrol tank for the camper.  I’ll post details about that when it’s finished but I’ve been comprehensively diverted from tin bashing projects by some home improvements.

We’ve just had an extension built that will be our new utility room and I’ve been painting and decorating and building a cabinet for the butlers sink to stand on.  I quite enjoy woodworking, the only trouble with wood is that it’s made out of wood.  It would be much better if they made wood out of steel.  If you cut wood in the wrong place you can’t weld it back on again!

The new work surfaces arrive next week, so hopefully after next weekend I can get back to bashing stuff. Of course, I’ll still have the kitchen to refit…….

I’ve been so busy over the last few weeks I’ve not had a chance to blog.  My day job is frantic, I’ve had a jolly to Norway, which is nice…I’d move there tomorrow! And I’ve got the builders in to extend my house.  I’ve still found some time to get a bit done though.

I’ve done a bit of archaeology, digging out the remains of a door from what seems like centuries of filler build up!  There is little detail of the original panel so I had to take great care not to destroy the only evidence of what shape the door skin should be.  I think I’ve got a good pattern from it, we’ll soon see!

That’s always our favourite excuse isn’t it?  “Yes dear, I’m going to fix the leaking tap.  I’m sitting here reading Motorsport Magazine because it’s all in the preparation. You can’t rush these things!”

Well sometimes it’s true.  I’ve spent the last few days sitting, looking and thinking about how to proceed with my repairs.  To get as close to the original construction methods with my repair panels as I can.  It’s critically important too, with a vehicle that you simply can’t by parts for cocking it up would be catastrophic.

I’ve tried to reverse engineer the foot well, wheel arch and sill non-destructively.  Work out where the original panel start and finish.  Where they overlap and join and therefore how I can unpick the stiches, saving the good parts and replacing the bad.  I’ve ascertained there will be some casualties along the way and investigated how to replace them before I destroy the originals.

One such piece is the A-Pillar.  It’s shot, with a stress fracture right across it at the door hinge.  It also traps a repair panel I made earlier but have yet to fit.  I will never find a replacement and it is absolutely critical to the strength of the vehicle.  So I had a bash (pun intended) at making one using a hammerform.  It’s come out quite well.  I have a bit of dressing to do to pretty it up a bit but the structure is there.  The stress all got a bit too much for it at the bottom but I’m happy to graft a bit on there to finish it off.

View albumView albumView albumView albumView albumView albumView albumView albumView albumView albumView albumView albumView albumView album

A few weeks ago the persistently appalling weather set in motion a series of events that may rumble on for months.   Unable to work outside I resolved to <dramatic music> clear some space in my workshop!

My property is quite modest in size even by British standards.  When I had my garage built the best I could do was a single car garage big enough to work around a Lancia Delta with all 5 doors open.  It would work too, except I haven’t got one car in it.  I’ve got one car and enough bits to build 3 more!  Plus an ever increasing number of tools.  And a load of reclaimed timber (because I’ve been known to butcher some wood too, occasionally). So I took the bull by the balls and started to go through the proceeds of the last 20 years hoarding.

I’ve given away a Ford x-flow to a friend with a Westfield. Sold a couple of Lancia gearboxes on eBay, found some Twin Cams I’d forgotten I’d got.  Found four oxy-acetylene welding torches and two cutting torches – not bad going for someone who can’t get his bottles filled any more!

radio2I found a 1950’s Ford valve radio, which I’ve subsequently ID’d as the type fitted to the 1956 model Zodiac, Zephyr and Consul!  Seriously! How can I be hoarding stuff that’s over a decade older than me!

Made by E.K. Cole Ltd, the ENFO branded radio must have been a serious piece of bling in ‘56.  The £28. 8s. 11d price tag is equivalent of £1659 comparative income today! Hopefully I’ll be able to reunite the thing with an appropriate dashboard, I know if I owned a classic Z car I’d love to have the original radio.  If you know anyone who’s interested, you know where I am.

The exhaust went on my friend’s 500 Sporting this week, so I spent some time yesterday fitting a replacement with him.  A pretty straight forward task which didn’t take long.  While the weather was good we took a look at his Barchetta, which has been flattening the battery when left standing.  I suspected the diodes in the alternator were allowing reverse flow, as the charge rate isn’t brilliant either but after disconnecting the alternator there was still a drain.  The previous owner has wired the stereo to be permanently live and disconnecting this reduces the current drain significantly but the jury is still out on whether this is the cause.

I’ve been patiently working at removing the paint from the frame of Pandora’s engine cover. For large areas of panel I favour the polycarbide preparation disks that fit on an angle grinder.  They strip paint in seconds with no damage to the metalwork.  Unfortunately they get ripped to pieces by edges, corners, bolt holes and the like, so no good for the job in hand.  So I thought I’d turn to a faithful old helper… Nitromors.

This stuff used to be the de-facto paint stripper by which all others were measured and would fetch paint off a body panel in minutes.  It’s active ingredients being volatile organic compounds, it has recently fallen foul of the EU’s ban on anything that actually works.  Replacing the VOC’s with New Improved Enviro-Bollocks has resulted in a product that does sweet F.A.!  It’s like losing an old friend.

Thank you eBay!  After becoming aware that it is very difficult to obtain good quality Blocking hammers any more I thought I’d better find myself one while I can.  Fortunately I immediately stumbled across a vendor selling an assortment of “New Old Stock” Wm. Whitehouse hammers, once made at the Atlas Forge just up the road in DSCF1923Sheffield.

I bagged a lovely 2lb Blocking hammer, a raising hammer and a cross pein hammer of unknown purpose which will be very useful for stretching flanges.  All they needed to bring them up to scratch was an hour with a Scotchbright pad and a can of WD40.

I can’t wait to bash stuff!

Progress on the engine cover has been steady over the last week or so.  After modifying my Sealey metal folder I was hopeful of a pretty good result with bending the flanges on my nicely wheeled panel and it did a fair job.  Far more precise and uniform than was possible before my modifications but in all honesty still not as crisp as the edges on the original.  I tried a number of things to crisp them up before making a doohickey especially for the purpose.

The simple device I made, by cutting a slot in a square drift allows me to hammer down on the edge of the flange to drive into the corner whilst at the same time preventing the flange from distorting.  The slot is a couple of millimetres shorter than the flange, thus ensuring I don’t damage the face.  Used alternately with a slapper & dolly on the side of the flange I smartened up the angle pretty well.  It might need a bit more work when I try fitting it but we’ll see…  A little shrinking of the edges produced the right profile to the panel and it started to look pretty good.  Of course this brought me to just the point in the production process where you can really balls it up.

The handle passes through the skin with a shouldered hole. The aperture is 29mm but the shoulder is a couple of mill deep so the hole size needed to be 25mm.  I own one hole punch…it’s 30mm.  After a brief period of swearing and stamping my foot I realised that the punch had a nice taper on the back edge that might prove useful after all.  A test piece confirmed that it was spot-on for starting the shoulder!  After carefully transposing the position from my paper template I drilled and used the punch to create a witness mark.  A step drill and die grinder soon roughed out the hole and after hand finishing with a file I ran the punch again with an improvised flaring attachment.

After a whizz round with the aviation shears… A pretty passable engine cover skin.  Now if only I had something to attach it to.

I said there was a whole other story in it and here it is….

To make the 3 foot window sections I made recently I bought a larger metal folder.  O.K. right from the outset let me say I wasn’t expecting much.  The Sealey DF910 is a cheaply made import from China.  It states on the specification that it’s maximum working thickness is 22 gauge and I was always intending to use it for 20 gauge, so I was expecting to have to do a bit of modification.  As it happens the courier who delivered it beat me to it.  Talk about express delivery, I think they threw it from the back of the van as they drove past at 60 mph!  I had to weld bits back on and straighten bits and god knows what else.

Anywho!  The main fault with it for my purposes was the quality of the top clamp, which frankly would have struggled with 22 gauge.  There were few welds holding it all together because they clearly didn’t want it to warp with the heat, so they smoothed it out with filler and painted over the cracks.  And the clamping bolt holes were not in line.  The net result was a bend that was pretty sharp at one end, pretty round at the other and wherever the hell it liked in the middle.

I too wanted to avoid welding directly on the clamping surface, so decided on an adjustable brace on the triangulating element of the top beam.  The angle of incident would provide additional strength vertically and horizontally, both directions in which the beam bends under load.   I fashioned a brace out of black steel bar and an adjuster out of a nut & bolt and a piece of steel tube.  This modification provides a lot of resistance to the distortion the bar exhibited when under pressure and greatly increases the clamping load at the centre.  Finally I put a spot of weld in the bolt hole to relocate it in line with the other end.  I should have a nice even bend along the full length of the panel now.  Not bad for a cheap tool that I can still fold away against the wall when not in use.

I’ve had a few lazy days recently. Partly to give the neighbours a break but also to have a rest myself.  Work has been hectic and with all my extra curricular activities I’m about fried.

At times like this a friend in need is, as the old saying goes, a bloody nuisance.  Except this friend was Will and he did come to my rescue when I needed an old road spring to make the MKI Lipper.  What goes around comes around, so I was more than happy to have a bash at the job he brought me the other day.

Will is in to rowing and had a problem with one of the rowing clubs boats.  The oar supports had broken.  I can hear you shouting “ROLLOCKS!”, but really they were broken.

I’ve got an AC TIG welder but I’ve never used it in anger on aluminium, so I was keen to try it out.  It was an interesting exercise through which I learned a lot.

I had to grind a deep groove along the crack and build it back up with filler rod.  It took a lot more heat than I was expecting too!  I’ve done a little gas welding on thin aluminium, so fortunately I was expecting the point between “weld pool” and “puddle on the floor” to be a close one. So it wasn’t as pretty as I hoped but at least I didn’t bugger it completely.

This slideshow requires JavaScript.

Once I ground it all back to shape I re-drilled the holes with a washer to keep them on centre and overall it looked pretty convincing.  So…lightweight E-Type next then?

I’ve been pushing hard to get Pandora’s window frames grafted in before the inevitable bad weather.  I’m almost there now.  The frames are in and there is just a bit of metal finishing to do before I can get a coat of zinc primer on and put the windows back in.  I will still have everything below the waist line to repair before it gets painted properly but that’s not so urgent now that the thing is not filling up with water every time it rains.

To complete the internal structure I needed to clamp the components together in a confined space where welding clamps won’t fit.  I wandered down to Machine Mart in my lunch break on Friday and found some funky little clamps that were just the ticket.  I think I’ll get a lot of use out of them.

With the top rail holding the roof together I finally got to cut out the timber that was fitted between the main hoops of the structure.  Back in 1979 when Pandora was born, having two pieces of inch and a half square timber to attach your interior trim to was probably considered to be fine.  Of course if you get arse ended they’ll splinter and likely go straight through the drivers back!  So I’ve had ‘em out a bit sharpish.  I’ll fabricate some steel box sections and weld them in securely instead.

The window frames were a challenge.  Surprisingly they fitted a treat but there isn’t a lot of room to get in behind them and weld them in invisibly. Not to mention the question of a 3 foot butt weld in a very visible place along the side panel. On the middle window there was even some patching of the bead feature to do for good measure.  It took a lot of patience to TIG weld it all together, especially as it was sporadically blowing a gale too…winter is definitely coming!  I think it will all planish to a good, filler free finish though despite the odd blow hole to fix when the wind robbed me of Argon shield.  By the end of the week it will be primed and the window back in.  Then I can give my neighbours ears a rest.  Bless ‘em. I can’t believe I’ve not had a letter from the council yet!

This slideshow requires JavaScript.

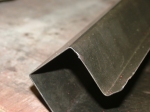
This weeks project has been to make a replacement sill or as our friends across the Atlantic would say “rocker panel”.  I’ve never really understood that but there you go, two nations divided by a common language.

I have never seen a replacement sill for sale either in the UK or Italy.  The ones I’ve got are patches on top of patches on top of gobbo.  So I scoured my manuals and pictures on the internet.  Eventually I found a nice engineering drawing of the van from the side and it became apparent that the sill is essentially symmetrical, which rather pleased me because it means that one pattern fits both sides.  Jules and I took some measurements and made some sketches, then it was on to a paper pattern and transferred to metal.

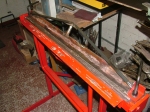
I had to pay particular attention to the order of operations, as ever some processes would make others impossible.  So first I wheeled a crown over the entire panel. Then transferred the features from the pattern and bent the bottom lip up.  These two operations gave the sheet of steel enough form to become rigid enough to handle more easily.

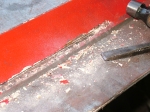
Next task…create the feature line about 40mm from the top bend.  This gave me more grief than i expected.  My cheap Chinese bead roller has never been particularly easy to drive.  It’s always had a mind of it’s own and marred the work.  It wasn’t any different this time!  I needed to do a bit more modification to it.  I filed the sharp edges from the dies.  God I wish I had a lathe!  And made a guide fence to ensure the lines remained straight.  Eventually I recovered the situation.  The marring isn’t too bad considering the panel will be protected with stone chip coating.   The other side will not be a problem when I make it, the bead roller works nicely now.

The top lip was bent, as the bottom was over a long piece of steel angle. and the front and rear flanges I threw with an old adjustable spanner.  To create the curve I used a combination of shrinking the flanges and wheeling with a rubber tyre.  I marked it up to gimp some drain channels in the bottom edge but changed my mind at the last minute.  The inner sills are sure to be bolloxed too, so I’ll put the drains in the new ones of those so they are invisible to the passing world.  I’m chuffed with the result and can’t wait to make one for the other side.

This slideshow requires JavaScript.

When I strip the interior out of Pandora to fit the new windows and roof structure i want to tackle the sills and wheel arches at the same time.  So I’ve started to make the parts for these too.

Today I’ve made a wheel arch repair.  It’s not quite finished as it needs some final dressing and the flanges turning where it joins to the adjacent panels.  I’ll have to do this last bit once I have the old metalwork cut out.

As with so many jobs the starting point was to make an FSP. This gave me a cutting pattern and allowed me to transfer the feature lines onto the steel sheet which I’d wheeled all over to form a slight crown.  Using the lines as a guide I leathered seven bells out of the flared portion of the arch on the sandbag with a bossing mallet.  Alternating between the bossing mallet and the English Wheel to get a smooth flare of the right size.  Then I turned a lip with the MKI Lipping Tool I made for the Spider arch a few weeks back.  It’s taken about 8 hours and there’s another hour of dressing to do when I fit it but I’m pretty happy with the result…

This slideshow requires JavaScript.

It’s taken a lot of thought and a great deal of work but I’ve produced my first window frame for Pandora.  In a previous post I showed you the hammer form I created for flow forming the sides of the window frame.  Here’s how I used it.

I cut a suitably sized blank out of 1mm steel sheet and folded a half inch lip along the edge.  This was to give me a fixed datum line that would not move when I started forming the shape.  I used the Lancaster Shrinker to create the general profile of the panel by shrinking the lip.  Once it matched my profile gauge I clamped it to the hammer form which acts as the die.

Flow Forming can require a pretty elaborate “die” but when you have to make a number of matching components the ROI is worth it.  I have three window frames to make as well as a tailgate skin which all use the same components.  You should really use a high quality air rivet gun to do the forming but they are expensive and I can’t justify the expense right now.  I used my air chisel which is a very crude implement in comparison.  Crude but effective!  I bought a couple of riveting heads for it. One in nylon, one in aluminium and one brass.  The nylon head allows the shape to form without bruising the metal and the alloy one can be used to crisp up the edge features once formed.  In the corners a little stretching was needed and on the straights a little shrinking.  In a short time one side was done.  Wash, rinse and repeat for the other side and I had a matching pair.

This would make a very small window, ideal for firing arrows out of but I wanted something bigger!  So I had to make a top and bottom edge.  Initially I made a curved die for the metal folder by welding a bar of the right diameter to a piece of flat stock.  It wasn’t a great success and I ended up with all sorts of steel clamped together in the vice to produce the right radius on my folds.  As my old Dad always says, there must be an easier way to do this.

Eventually I had a form that matched and using a hardboard template made from the original window I lined up the sections and measured and measured again before making the cuts to butt weld them together.  Break out the TIG and cue much welding grinding and dressing before the final fold along the top edge.  Then all that was needed was a little finessing with the shrinker to make sure the rails were straight et voila!

Hopefully each successive one will get easier!

This slideshow requires JavaScript.

I have some pretty elaborate repairs to conduct on Pandora.  I need to fabricate rear wheel arch repairs but more pressingly right now I need to fix the roof and gutter rails.  The water leaking in through the gutters has rusted the window frame away and they are pretty difficult to obtain at any price.  So I’ve been working on a way to reproduce them myself.

Rather conveniently FIAT saw fit to make all of the side windows identical, so any solution is universal.  With this in mind I chose to invest more in the means to reproduce the shapes needed.  Making a panel this size in one go is a tall order.  Firstly there is the issue of handling something that large when you work alone in a confined space, despite being only three feet by two and a bit this is still ever a pain.  Then there is the concern that with so much detail to form you could ruin a lot of work with one slip up on the home straight.  Finally there is the financial concern about potentially wasting a lot of steel cut out of the middle of the panel. So I opted to make the panel in sections and weld them together at the end.

I wanted to keep the welds to a minimum and make discreet sections that minimised the risk of waste.  I worked out that the sides would be the most difficult to make and the top and bottom would be quite simple folded channels.  The top and bottom rails are actually longer than my folder, so I had to buy a longer one.

The best way I could think of to form the sides was with a hammer form, using a technique known as Flowforming.  I replicated the main features using steel bar welded to some 2mm plate, fleshed out with body filler and all screwed to a sturdy piece of plywood. It was a good days work to make. Let’s hope it was worth the investment…

This slideshow requires JavaScript.

I’ve been getting on with some tin bashing, honest.  But I’ve also been making some more tooling.

You can’t beat having the right tool for the job and I got some pretty useful tools in the haul I bought off eBay.  I got some great post dollies but to really make use of them I needed a tool post to mount them on.

View albumView albumView albumView album

I made a multi purpose tool post which will accept the large barrel post dolly and should accept the stakes that I’ve been looking at on the Frost website.  And I made a Hardy Hole adaptor to accept the smaller post dollies that I got too.

Damn, I wish I’d done it sooner, as it makes life so much easier.  Now I have a Hardy hole I can keep an eye on eBay for some blacksmith tools.

The only way to recover the balls up I made of the rear quarter was to roll my sleeves up, grab the slapper and dolly and drive the neighbours nuts (god bless ‘em for their patience) with the dink, dink, dink of a bit of planishing.

Flexible Sanding BlockGetting it right involves two techniques which I ought to be bloody good at by now.  The first is to use contour gauges to establish where the metal should be and the second involves using an aerosol can of paint and a sanding block to establish when you’ve got it there.

Whilst I was working on the rear quarter I took the opportunity to fill in the hole where the side marker lamp fits on the US spec Spider.  I put a light crown in a piece of scrap sheet and placed it behind the hole, scribed round it, then cut it very carefully to the line with my Gilbow hand shears.  I would normally lightly tack the piece in place with the MIG before fillerless TIG welding it in place.  That leaves a few lumps of filler wire to grind down so I thought I’d try the TIG from the start.  Bad plan, I won’t do that again.

As I welded it in I dressed the HAZ with a hammer and dolly and once it was fully welded in I covered the quarter in a light mist of black “rattle can” paint.  The sanding block I used is a strip of wood from an old louvre door.  It is flexible enough to bend to the contour of the panel but stiff enough to only touch the high spots.  A quick pass with the sandpaper shows the low spots, which are raised with some slapper on dolly action.  Successive passes with block, then slapper until the panel is smooth.  The only paint left is in the grinding marks.

There is another dressing to come when I smooth over the whole panel but you can see that with nothing more than some high build primer the hole is going to be invisible.

This slideshow requires JavaScript.

So about that hammer…DSCF1548

Amongst the haul of tools I recently purchased was a small and curious hammer.  Quite old, it has an interesting shape with an octagonal section, one slightly rounded face and a cross pein.  Both peins have a lot of reach.  I’ve never seen one like it but it looks like it might be a very useful tool.  Currently sans handle, I thought I’d have a bit of a google and see if I can find one.

It’s marked with the makers name and a small symbol which I couldn’t really make out.  So I searched for the makers name George Barnsley, Sheffield and soon realised that the symbol is a shoe.  The hammer is from a do it yourself shoe repair kit.

The website I discovered this from is the interesting and sad part of the story.  Dedicated to urban exploration, the site has details of the makers workshops in Sheffield, world renowned for the finest steel, the home of Henry Bessemer’s famous “converters” and the cradle of steel mass production since the industrial revolution.  As a photographer I was impressed by the wonderfully gritty images and moved by the evocative story they tell.  Take a look and mourn the sad passing of British industry.   http://urbandegeneration.com/george-barnsley-and-sons-ltd-sheffield-may-june-2011/

donkeyYeah….I wish now I’d thought a bit more about that title before I posted.  Oh well!

So, Donkey Dick is a term used in the bodywork trade to describe a wing bumping hammer.  The reason is pretty self evident and I have to take my hat off to Eeyore, it’s a hell of a tool.  I found it on eBay along with a load of other panel beating tools which were a bit heavy to post.  About an hours drive away, it was worth a punt and I was lucky enough to win them.

I took a ride over one evening after work and met the seller. A charming gentleman who I suspect I could have spent hours chatting with.  He’d given up the trade 14 years ago due to ill health and had no further use for the tools.  After such a long period of disuse they were all generally a little rusty but fundamentally sound.  Many are vintage brand name tools, a body file from J.W. Pickavant before the Mr Sykes came along and chisels made in Sheffield.  There’s an interesting little hammer head too, with a back story all of it’s own that I might share with you later if you’re interested.  There’s a host of home made slappers and dollies too.  After going nuts with the sandblaster, flap wheel and Hammerite paint they cleaned up pretty well.

As workshop folklore has it, old tools are imbued with the skill and experience of their former owners. So I can’t wait to start using them and expect the standard of my work to take a further step forward as I channel the years of experience they’ve soaked up.