Archive for the ‘Spider’ Category

The only way to recover the balls up I made of the rear quarter was to roll my sleeves up, grab the slapper and dolly and drive the neighbours nuts (god bless ‘em for their patience) with the dink, dink, dink of a bit of planishing.

Flexible Sanding BlockGetting it right involves two techniques which I ought to be bloody good at by now.  The first is to use contour gauges to establish where the metal should be and the second involves using an aerosol can of paint and a sanding block to establish when you’ve got it there.

Whilst I was working on the rear quarter I took the opportunity to fill in the hole where the side marker lamp fits on the US spec Spider.  I put a light crown in a piece of scrap sheet and placed it behind the hole, scribed round it, then cut it very carefully to the line with my Gilbow hand shears.  I would normally lightly tack the piece in place with the MIG before fillerless TIG welding it in place.  That leaves a few lumps of filler wire to grind down so I thought I’d try the TIG from the start.  Bad plan, I won’t do that again.

As I welded it in I dressed the HAZ with a hammer and dolly and once it was fully welded in I covered the quarter in a light mist of black “rattle can” paint.  The sanding block I used is a strip of wood from an old louvre door.  It is flexible enough to bend to the contour of the panel but stiff enough to only touch the high spots.  A quick pass with the sandpaper shows the low spots, which are raised with some slapper on dolly action.  Successive passes with block, then slapper until the panel is smooth.  The only paint left is in the grinding marks.

There is another dressing to come when I smooth over the whole panel but you can see that with nothing more than some high build primer the hole is going to be invisible.

This slideshow requires JavaScript.

I’ve been busy with a whole host of things just recently and progress has been slow on the Spider.  I need to get cracking because I’ve got stuff to do to Pandora and maintenance on our daily fleet to take care of.  I’ve almost recovered the situation with the rear arch.  I’m piecing together the sill and fiddly bits around the arch before closing up the tub again.  But I thought I’d post some work I did some time ago on the front wing.

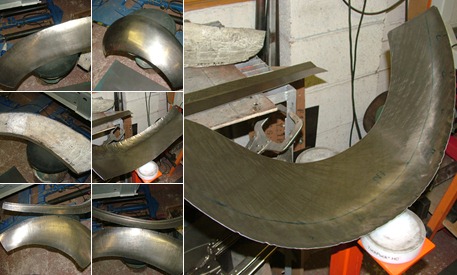
I’ve been concentrating on the hidden repairs whilst I hone my skills but the first bit of cosmetic repair I attempted was on the front wing behind the wheel arch.  This was pretty badly corroded and some areas where missing entirely.  I tried to reconstruct the shape with aluminium “battle repair” tape and then made a flexible pattern.  It turned out to be a little bit wrong and I had to finesse it but on the whole it was close enough.

It’s not perfect but it’s good enough to not need any filler, which is the goal with all my repairs.

When I made this piece I only had a few cheap hammers and dollies, I think I could make a better job of it now.  We’ll see when I do the other side, won’t we?

This slideshow requires JavaScript.

It was two big lads that look like me but they ran away!

Who am I trying to fool?  That defence never worked when I was kid and nobody is going to believe it now.

I took one step forward and three back this week when I managed to make a cock up of the rear quarter.  I was using the shrinking disc to blend in the wheel arch and it was going well until I got a bit too eager and managed to gall the rear quarter, both in front and behind the wheel arch.  Suddenly the “good bit” that I didn’t need to touch was shrunk and wrinkled.  Utter stupidity on my part that has cost me a weeks progress.

DSCF1465The shrinking disc is very effective!  You can see the damage inflicted in the upper right of this picture. One careless pass is all it took.  Because my workshop is so cramped I could not position myself to see the work properly and had made a full arc before I realised what I’d done.  What a tit!

So I’ve been rectifying the damage.  And it’s been a useful exercise to be honest.  I found a few dents that the previous “restorer” had filled, so I smoothed those out at the same time.  I’ve got everything aft of the arch pretty close and when I’ve patched the hole where the US model side marker light used to fit, it should be a simple task to give it a final dressing to a filler free finish.

DSCF1463So tomorrow (after the Grand Prix of course) I’ll repair the mess I made forward of the arch and dress that out. Then perhaps I can get back to the task of assembling the inner arch and the bottom corners of the outer arch, jigsaw fashion.

I’ve got to get on with it because there are other jobs backing up that I need to crack on with.  I don’t have time to go to work any more, there’s too much to do.  Where’s that (even modest) lottery win when you need it?

I turned the lip of the arch with a hammer and improvised dolly made from some 12mm bar. The original has an elegant curve on a radius of about 6 or 7mm but mine was a little too sharp and not very consistent.

I don’t have much in the way of T-dollies and I probably wouldn’t have the skill to use them properly anyway so I decided to make a “gizmo” that could produce a consistent radius.  The ideal die would be a piece of old road spring but after dragging out my scrap bin I found that the ones I cut off the Spider have already gone for recycling.  Fortunately my friend Will had recently changed the springs on his 3 Series and offered the old springs up for sacrifice.  These worked very well, with a variety of core diameters and radiuses available they are going to make some excellent T-dollies!  (I’ll make a set for Will too.)

View albumView albumView albumView albumView album

So with the most detailed plans I could fit on the back of a fag packet I set about some steel offcuts and produced the MKI Lipper.

No prizes for guessing how it works, it’s not rocket science.  But after a couple of passes I had a very consistent and professional looking radius around the arch.

And all that.  My hopes of getting the wheel arch put to bed this weekend suffered a minor setback due to an incident involving £35 worth of unleaded and our FIAT 500 Diesel!  As a result a sizeable chunk of my long weekend was spent draining the fuel tank and refilling it with the right juice.

Some progress was made though.  I ground the welds flat and started dressing them out.  I learned an important lesson here too.

This slideshow requires JavaScript.

When I welded the arch in I made a mistake.   I described the process in an earlier post but let me reiterate.  I started to weld at the top of the arch and initially everything went very well, with rapid progress because the panel fitted well for a good 1/3 it’s length.  As I got closer to each end it became more difficult to fit up perfectly and I had to dress the HAZ to stretch it back into shape.  This is where I went wrong!

Because I didn’t have to, the top of the arch remained un-dressed (ooh err missus).  Because I did have to the bottom of the arch got well and truly leathered to bring it back into line.  So once the welding is complete I’m left with a very uneven HAZ, some needing stretching, some not so much.  Working out which areas need what is not easy.  I should have welded a length, let it cool and dressed it before moving on to the next bit.

The problems are not insurmountable but have made my life a little more difficult.  Ho-hum.

Next time I’ll show you the gizmo I made for shaping the wheelarch lip…

The outer arch repair is now attached.  I butt welded it with the TIG and it doesn’t look too bad.  I used Intergrips to hold it in place but you’ll see in the pictures that these were placed around the lower regions on the arch in order to allow me to fit the top of the arch up with zero gap.  I welded the top and stopped to move the Intergrips down a little at a time.  All the while butting up the next segment prior to welding.  First down one side of the arch and then down the other.  Being ambidextrous helps me a lot here.

The closer I got to each end of the panel the more difficult it became to wrestle the panel into place.  I had to dress the HAZ quite a lot to get the panels to line up.  And inevitably for a novice TIG welder I got the odd blow hole to fill.  As a result I’ve ended up with quite a bit of distortion across the quarter.  So next mission is to learn how to dress it all out!

This slideshow requires JavaScript.

I’ve had a couple of “light bulb” moments this weekend. The sort where you don’t even realise there is something you can’t see until you see it.

I’d got the new arch repair held in place with Cleco’s and was working the lip on the outer tub.  It was giving me some real grief because turning the lip to fit exactly to the lip on the arch repair is very difficult to achieve.  The shape of the panel changes with even slightest alteration to the lip.  After a couple of hours of banging my head against a brick wall I decided to cut the lip off and make an entirely separate piece, then graft the two together.

After cutting off the lip it dawned on me that with the lip in place I’d never have got the panel into situ when the arch is fitted.  As I alluded to in an earlier post I need to fit the arch repair without the tub in place so that I can get a dolly behind the weld and dress out the shrinkage, then fit the tub behind the arch.  Fortunately this revelation happened before I welded the two pieces together!

So after fabricating the new lip I set about the task of preparing to fit the arch.  I trimmed the outer edge of the arch and cleco’d it to the quarter. Then I scribed a line along the joining edge onto the quarter and put indexing marks to help locate the panel after cutting.

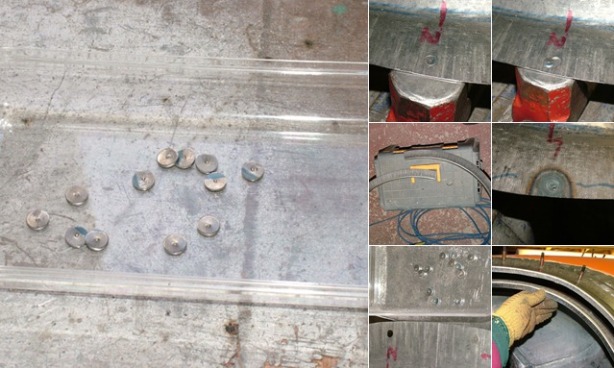
Once cut the cleco holes will be of no use, so I set about making good.  First I used my Roper Witney hole punch to enlarge each 1/8” drill hole to 1/4”.  Then using “flash” punched from a piece of scrap sheet I plugged the holes by inserting and “setting” the small discs into the holes in the arch.  Then a quick wizz round with the TIG and the holes are gone.

Wow! That was fun!  Possibly the most difficult piece I’ve made to date, I’ve pretty much completed one arch.

I took an FSP from the “good” side. It wouldn’t really turn inside out but did allow me to transfer the features to the sheet steel.  Last time my index holes were a little too big so I made a makeshift hollow punch from a couple of roll pins.  These were much more accurate to line up with.

I started by wheeling a bit of shape into it, taking care to avoid the blue line by running some masking tape over it. It wasn’t putting the shape in fast enough so I took the bull by the balls and switched to the bag and bossing mallet. A couple of passes and the shape began to appear.

I made a set of contour gauges from the “good” side.  Lined them up with my index holes and used them after each dressing to make sure I was heading in the right direction.  I worked each area a little at a time, with a slapper & dolly and stretcher. Every time I worked it in one place it would affect it somewhere else!

Once happy with it I cut the lip off the old bodge repair and put some indexing holes through both panels, then put some Cleco’s in to hold the arch in the right place while I work the outer tub.  Once it’s ready to butt weld in place I’ll plug the holes using the discarded flash from my Witney hole punch…more on that later.  Just a few finishing details to add but I’m happy with the outcome.

This slideshow requires JavaScript.

The rear arches on the Spider have been bodged…badly bodged before.  It’s a good job you can only see one at a time because they don’t even match.  The driver’s side that I’m working on right now is clearly a quarter inch deep with gobbo and has so much heat distortion that the filler extends halfway along the rear quarter.  So while I’ve been bashing away at the tin to make a new arch, Jules has been trying to chisel out all the filler so we can see what it is like underneath.  It’s a hideous mess of dismal welding and even more dismal lead filling.

This slideshow requires JavaScript.

The "Good" Side

Fortunately the other side only had a little filler in it and was otherwise pretty original.  The “good” side is rather a generous term for it but it was “good enough” to take an FSP off. Steel is taking shape now and when it all goes back together there WILL NOT be any filler necessary!

My Spider wheel tub repair is dependant on getting the wheel arch repaired and vice-versa.  So I need an arch repair panel before I can go any further.  It’s a complicated panel with a lot of compound curves and the thought of making one gave me palpitations, so I decided now was the time to open my wallet and buy some of the bits that I can’t avoid having to buy!

There is a specialist supplier in Germany who a lot of UK owners have reported using at some time so I went to their website, downloaded their catalogue and looked up the bits I need.  Having put about £500+ worth of bits in my basket I found that their order page does not appear to be secure.  So I used their email contact details to request a total price for purchase and shipping….that was over 2 weeks ago and I’ve not had a reply.  I’m hopeless at languages so I don’t see the point of making an international phone call to someone I can’t communicate with.  I tried a couple of other online German suppliers, who didn’t have the parts I wanted in stock.

So there’s no alternative, I’ve got to make the wheel arches….

Watch this space!

DSCF1380The inner tub is finally welded in place. It was a bit of a wrestling match as the heat required to MIG the spot welds caused a bit of distortion and places where it used to fit suddenly became a mile out.  After a bit of a thrashing with a slapper I eventually made it fit like a stocking on a chicken’s lip.

I have yet to fit the outer tub and wheel arch…and that is where it becomes complicated.  I need the outer arch repair to know where to turn the lip on the outer tub and I need the outer tub in place to get the arch repair to fit in the correct place. But I need the outer tub out again so that I can dress the welds on the wheel arch and get the bodywork back to the right shape.  Then I can finally weld the outer tub in.

The heavy reinforcing gusset will be last on the agenda.  I suspect if I put it in before fitting the outer tub, the distortion will be so great that the two pieces will no longer fit together!

My inner tub has had a final fitting and is about to be welded in place.  I have almost completed the outer tub but I can’t finish it yet.  The wheel arch is entirely bodged up with filler so until I have the new arch fitted I’m not going to turn the lip that mates with the arch.  I’d probably find that they didn’t line up and the critical bit is that it looks right from the outside, nobody is going to look under the arch.

Having got the flange where the two tubs meet to line up I cut away the old inner tub.  The box sections behind are in good shape, so I just Metal Readied the cleaned areas prior to welding and spayed a little zinc inside the cavities.  Then slotted in the new piece, aligning it with the existing panel.  Once it’s all stitched up I’ll repeat for the outer and all should be where it’s meant to be!

This slideshow requires JavaScript.

The outer half of the Spider wheel tub is coming on nicely. The TuckPuck is great for getting the bulk of the shape into a panel like this.  It took a couple of hours to get each section shaped and I’m about ready to trim the joint line and zip them together.

All the pieces of the first wheel tub came together today.  Ably assisted by Jules I stitched the component parts together and it looks like it should.

I have a bit of final dressing to do when the outer shell is complete and I can see how the two fit together but it’s pretty much there.

The next piece is already cut out and taking shape.

Like it should have been in the first place!

I have been busy again recently, so not made as much progress as I’d hoped.  But as well as uploading a batch of photo’s to my stock library I did manage to get the wheel tubs back on track.

DSCF1346

DSCF1344

Having nearly lost the use of my hands through pounding shape into these panels I adopted plan B and made them in sections.  Here’s the first one tacked up ready to TIG.  I’ll get all the sections tacked together and then blitz them up in one

It’s been a frustrating time over the Christmas break. I haven’t done anything like as much as I’d hoped.  Last week I was back at work but instead of being in the office I was on an application virtualisation training course, so I didn’t get a lot done in the evenings and the weekend has been less productive than I’d hoped too.

Most of the frustrations have been self inflicted.  I have been developing some new skills with new tools and I made a poor choice initially.  There were two ways to approach the task in hand, an easy but long winded way and a harder method with fewer steps.  When you’ve got no experience of either sometimes you just have to try things out and that’s what I did.  I almost pulled it off but with hindsight I chose the wrong path.

Here’s a spoiler.

View albumView albumView albumView albumView albumView albumView albumView albumView album

I started the rear wheel tubs for the Spider and tried to make them in one piece.  My new TuckPucks work really well but perhaps not quite well enough to make these in one go.  The problem as ever is getting the shrinkage deep enough into the panel.  I almost succeeded and perhaps with the lessons learned on these panels I’d be able to do it this way in the future but there was so much hammer work involved that my wrists and hands are about shot.

Discretion being the better part of valour I’m going to use what I’ve made as a basis for a cut and shut two piece approach. That’s the way I should have done it in the first place.  C’est la vie!

But I’ve learned a new rule of thumb for the future.  If the FSP has so much shape in it that you can’t flatten it on the steel to work out the size of the blank, you need to section it.

That’s not a description of how I’ll feel after all the Christmas excess, it’s the next job on the Spider.  It’ll be good practice for the Amigo too, as I have a similar job to do on that.

The wheel tubs and arches are in a pretty poor state, so I’m trying to figure out the best way to tackle them.  The arches will be fun, I think one side is pretty much unmolested but the other is definitely a gobbo work of art.  I’m going to try to reproduce the structure behind the arch first though.  This is what I’ve found so far.

Whilst tidying up the mess I left in the garage at the weekend I was musing over the front valance I need to make for Gina.

The original is designed to be hidden behind great ugly US spec. impact absorbing bumpers. It has a poorly proportioned rectangular hole in it, most of which misses the radiator anyway.  When I put some nice elegant european spec bumpers on the hole would be a bloody eyesore so I’m going to make something more akin to what the earlier cars had.  I might opt to put a narrow slot in it just below the bumper with an oil cooler behind it. I haven’t decided yet.

Gina’s sills needed a lot of work.  Check out the first chapter in this horror story here.

With the floorpan in place I could tackle the structural members.

Here’s how I did it.