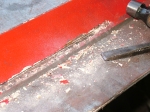
I’ve chased the corrosion back from the sill all the way to the chassis outriggers now.  The rear one has a hole for the petrol tank filler neck and it’s badly corroded at the bottom behind the jacking point.  I deliberated for a while about just repairing the bottom but the thought of trying to remake the afore mentioned hole whilst grovelling underneath left me cold.  I decided to make a whole new outrigger on the bench and graft it on where the cancer ends.  Let the fabrication begin.

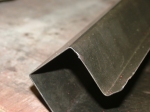
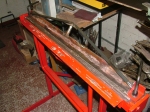
I sketched up the piece to be made and took as many measurements as I could from the remains of the original.  It can be really tricky to find suitable reference points to get all the dimensions right and it took a considerable amount of time before I was satisfied. Then I marked out some 18 gauge and started cutting and folding.  I used a plywood template as a guide for the air nibbler to cut the holes which I then flared to accept the tube I created for the filler neck hole.  I’ll cut the old one off and slot the new one into the void created, then MIG weld all around it.  Doesn’t that sound easy.

That’s always our favourite excuse isn’t it?  “Yes dear, I’m going to fix the leaking tap.  I’m sitting here reading Motorsport Magazine because it’s all in the preparation. You can’t rush these things!”

Well sometimes it’s true.  I’ve spent the last few days sitting, looking and thinking about how to proceed with my repairs.  To get as close to the original construction methods with my repair panels as I can.  It’s critically important too, with a vehicle that you simply can’t by parts for cocking it up would be catastrophic.

I’ve tried to reverse engineer the foot well, wheel arch and sill non-destructively.  Work out where the original panel start and finish.  Where they overlap and join and therefore how I can unpick the stiches, saving the good parts and replacing the bad.  I’ve ascertained there will be some casualties along the way and investigated how to replace them before I destroy the originals.

One such piece is the A-Pillar.  It’s shot, with a stress fracture right across it at the door hinge.  It also traps a repair panel I made earlier but have yet to fit.  I will never find a replacement and it is absolutely critical to the strength of the vehicle.  So I had a bash (pun intended) at making one using a hammerform.  It’s come out quite well.  I have a bit of dressing to do to pretty it up a bit but the structure is there.  The stress all got a bit too much for it at the bottom but I’m happy to graft a bit on there to finish it off.

View albumView albumView albumView albumView albumView albumView albumView albumView albumView albumView albumView albumView albumView album

DSCF1980It’s funny how one thing leads to another.  The front wheel arches on Pandora are shot, so obviously I’ve been drawing up plans to make a new petrol tank!

How does that work?

Well the arch meets the sill behind the wheel.  The sill is shot, in best Blue Peter fashion, here’s one I made earlier.  I know the inner sill behind it is also shot and I need to cut away the rust and repair it too.  Right behind the inner sill is the petrol tank.  I didn’t want to go nuts with the plasma cutter when the tank is right behind it, so I dropped it down.  I soon realised that the tank was also shot, hence the mission to create a new one.  I’ll let you know how that goes.

View albumView albumView albumView albumView albumView albumView albumView album

In the meantime I’ve been waving the plasma cutter round like Darth Vader’s light sabre. Sometimes even making that “Whhaaarrm Whhaaarrm” noise and breathing heavily.  Plasma cutters are fun!  Now I can see what I’m up against…

A few weeks ago the persistently appalling weather set in motion a series of events that may rumble on for months.   Unable to work outside I resolved to <dramatic music> clear some space in my workshop!

My property is quite modest in size even by British standards.  When I had my garage built the best I could do was a single car garage big enough to work around a Lancia Delta with all 5 doors open.  It would work too, except I haven’t got one car in it.  I’ve got one car and enough bits to build 3 more!  Plus an ever increasing number of tools.  And a load of reclaimed timber (because I’ve been known to butcher some wood too, occasionally). So I took the bull by the balls and started to go through the proceeds of the last 20 years hoarding.

I’ve given away a Ford x-flow to a friend with a Westfield. Sold a couple of Lancia gearboxes on eBay, found some Twin Cams I’d forgotten I’d got.  Found four oxy-acetylene welding torches and two cutting torches – not bad going for someone who can’t get his bottles filled any more!

radio2I found a 1950’s Ford valve radio, which I’ve subsequently ID’d as the type fitted to the 1956 model Zodiac, Zephyr and Consul!  Seriously! How can I be hoarding stuff that’s over a decade older than me!

Made by E.K. Cole Ltd, the ENFO branded radio must have been a serious piece of bling in ‘56.  The £28. 8s. 11d price tag is equivalent of £1659 comparative income today! Hopefully I’ll be able to reunite the thing with an appropriate dashboard, I know if I owned a classic Z car I’d love to have the original radio.  If you know anyone who’s interested, you know where I am.

I’ve been AWOL for a few weeks now for various reasons; work commitments, family commitments, appalling weather and illness resulting from a self inflicted injury sustained whilst kart racing on a stag do! Will I ever learn?

Things are beginning to return to normal, with glorious weather at the weekend my nephew brought his wife’s Honda CRV Diesel round for a service.  Using one of his “Free Service Coupons” as he puts it, cheeky bugger!  Not content with that he returned later with his Vivaro van.  Getting through those coupons at quite a rate Winking smile.

The van was an outstanding job from a few weeks back when the weather was rather inclement.  I spent a day in the pouring rain freeing off seized brake callipers but it was clear whilst I effected a temporary repair, that a refurb was necessary.

Service Kits GaloreCallipers tend to be sold as service exchange these days. Even my long standing and trusted local factors Allwoods Automotive are reluctant to chase a service kit any more.  Fortunately there is a good online supplier, BrakeParts International who still seem to be able to get a good selection of parts.  So I ordered a pair of seal kits and a piston for the Van.  While I was paying for shipping I figured I’d get a couple of sets for my fleet at the same time.

We stripped the ailing callipers and found that on the whole they weren’t in bad shape.  The problem was caused by rough treatment in the past, with the dust seals being shredded, probably while squeezing the pistons back.  Following a clean-up the new parts were duly fitted and everything slipped back together a treat.

At a later date I’ll document the refurbishment of the callipers on the Spider and Integrale.  Watch this space if you are interested…

It’s still pretty crazy here at the Scuderia Obsoleto.  I’ve passed Microsoft System Centre Configuration Manager 2012 certification this week and now have a couple of weeks to learn everything I need to know to pass Cisco CCNA certification.  So I’ve not got a lot done on any of the fleet!

Last time I posted I was trying to free hand a front valance corner because my FSP was not particularly great.  The original panel was all lumps and bumps and pretty ugly looking.  I got my replacement piece to somewhere near the right shape and decided I needed to really see the original before going any further.

bosch_pmf-180EShifting old paint, underseal and filler is a particular bugbear of mine right now.  I don’t have the space to media blast large parts and I seem to spend longer stripping the crap off my old panels than I do making the new ones.  So I recently bought one of these:

It’s not a quiet thing by any means but with the scraper blade on it’s pretty effective at removing underseal and sound deadening.  Which is where the element of surprise comes in.

DSCF1975Once the snow melted I went and grovelled on the floor with my new jiggity thingy and started scraping.  It turns out the valance is actually in better shape than I thought.  It has a few dents from insensitive parking but it isn’t stuffed with filler at all.  All the gnarly lumps and bumps were underseal, presumably applied with a trowel.  So I’ve put the brakes on with the new valance until I can get underneath and evaluate the situation a little more thoroughly.  I might just get away with making a new flange….

Crazy days have ensued at the Scuderia Obsoleto.  I’ve been snowed under and not just by the weather.  That pesky day job has been getting in the way again.  Work has been manic and I’ve been studying hard to update some of my IT certification.  I still have some more to do.

I’ve been juggling home maintenance, helping out a few friends and watching my oldest nephew get institutionalised.  He’s away on his honeymoon now, as it was the “institution” of marriage.  So I’ve picked up some hammers and I’m getting back after it.

On the agenda while I’ve only been “bit & bobbing” was the front valance.  This is mainly filler and patchwork plates, so my FSP wasn’t particularly accurate.  I’ve not been taking it for gospel, instead using a more freehand approach to get one end looking right.  Then I’ll make a better FSP from it to use for the other corner.  They have to match each other, not the crap that I cut off.  The section between the two corners should be a doddle by comparison.  I’ll let you know how that works out for me Winking smile

Sometimes you just have a change of plan and that’s what I did with the engine cover.  Instead of re-skinning the spare cover I picked up I decided to leave that one in tact.  There is little to no corrosion on it but the skin has some dings and dents.  I decided it would be an interesting exercise to see if I can straighten this out, I might be able to learn some valuable lessons from it.  Not now but in the future.  So I set about the original engine cover and removed the skin.  It was stuffed with a lot of stringy filler and badly corroded all around the outside.

I need to find a better way to strip paint off panels, I really do!  Getting the frame structure for the engine cover back to bare metal took longer than the repairs did but finally I got there.  After Nitromors, Caustic Soda, hot air gun, rotary nylon and wire brushes, flap wheels, scrapers and sand blasting!

With the paint gone the extent of the corrosion could be assessed and it was pretty bad.  I had to make new sections top and bottom and graft it all together.  My new improved metal folder proved to be improved but not perfect so a bit of manipulation was required.  Ultimately it all came together and I was able to put the new skin on the repaired frame for a test fitting.  Not bad at all.

I decided to bond the two pieces together using structural panel adhesive.  For two reasons really, my spot welder tips are too big to fit the lip on the panel and I wanted to make sure the internal surfaces were better protected than they were when they left the factory.  Everything got a liberal coating of zinc primer before bonding and the end result is quite satisfying.  I can’t wait for the warmer spring when I can apply some paint and see how it looks.

View albumView albumView albumView albumView albumView album

2012 in review

Posted: January 3, 2013 in Scuderia

The WordPress.com stats helper monkeys prepared a 2012 annual report for this blog.

Here’s an excerpt:

600 people reached the top of Mt. Everest in 2012. This blog got about 3,800 views in 2012. If every person who reached the top of Mt. Everest viewed this blog, it would have taken 6 years to get that many views.

Click here to see the complete report.

With Christmas over and the New Year approaching I thought I’d take a minute to thank Santa for his generosity.  I was lucky enough to get quite a few new metalworking toys amongst the goodies in my Stocking, thank you to all of my family for my steel rules, framing square, hole punches, tin snips, windscreen tool and book; The Home Workshop (Odhams Press 1948). Which will prove invaluable should I need to identify and replace a faulty valve in a wireless set!  I can’t wait to watch the Ron Covell DVD’s.  Strangely Jules doesn’t share my enthusiasm here?

Unfortunately Santa also brought me crippling back pain, so I haven’t had much chance to try any of them out but I did endure long enough to make Jules a gift in lieu of a Christmas card.  I got the opportunity to try out my new Midwest tin snips.  My 25 year old ProSnip’s (I think these are now sold as Irwin) are showing some signs of wear, so they will now be used for roughing out and the shiny new Midwest’s will be used only for precision trimming.  I also had a play with TIG brazing.  I got to fiddle with different power and gas options, try different techniques and generally got a better understanding of how the filler flows.  All useful stuff for real world situations in the future.

Merry Christmas

The decoration is made from scrap offcuts and based on the vintage theme gift tags we use on our presents.  Each one is 80x45mm and hung from a piece of picture wire.  The brass rod it is hung from is the only thing I had to buy.  I think Jules is pleased with it but I’ll know for sure if she hangs it up again next year…

Merry Christmas and a Happy New Year to all!

The exhaust went on my friend’s 500 Sporting this week, so I spent some time yesterday fitting a replacement with him.  A pretty straight forward task which didn’t take long.  While the weather was good we took a look at his Barchetta, which has been flattening the battery when left standing.  I suspected the diodes in the alternator were allowing reverse flow, as the charge rate isn’t brilliant either but after disconnecting the alternator there was still a drain.  The previous owner has wired the stereo to be permanently live and disconnecting this reduces the current drain significantly but the jury is still out on whether this is the cause.

I’ve been patiently working at removing the paint from the frame of Pandora’s engine cover. For large areas of panel I favour the polycarbide preparation disks that fit on an angle grinder.  They strip paint in seconds with no damage to the metalwork.  Unfortunately they get ripped to pieces by edges, corners, bolt holes and the like, so no good for the job in hand.  So I thought I’d turn to a faithful old helper… Nitromors.

This stuff used to be the de-facto paint stripper by which all others were measured and would fetch paint off a body panel in minutes.  It’s active ingredients being volatile organic compounds, it has recently fallen foul of the EU’s ban on anything that actually works.  Replacing the VOC’s with New Improved Enviro-Bollocks has resulted in a product that does sweet F.A.!  It’s like losing an old friend.

Posted: December 21, 2012 in Uncategorized

I have an additional project to work into my schedule. My wife is a historian and keen cook. She has started producing a blog to document a lifestyle experiment we are undertaking and my services and my camera are required, so I’ll be learning “Food Photography” techniques….. Have a look, you might find it interesting.

Ration Book Cookery

Rationing was introduced on the 08th January 1940 and ended on 04th July 1954.  Despite the hardships and privations of this period, the British people had never been so fit and well nourished as they were by the end of rationing.  Since then we have become one of the unhealthiest and fattest nations in Europe – not to mention the massive and unsustainable debts we have accumulated.

If you want to take up arms in your own personal war against dimishing health and wealth, then why not join me in some common sense Home Front wisdom!  I realise that starting this ‘battle’ two weeks before Christmas is probably not the most sensible thing I have ever done but I do not want to start 2013 fatter and further in debt than I am today.  I have all the necessary books, leaflets and knowledge so now it is time to put my theories to the test.

Along the…

View original post 169 more words

Thank you eBay!  After becoming aware that it is very difficult to obtain good quality Blocking hammers any more I thought I’d better find myself one while I can.  Fortunately I immediately stumbled across a vendor selling an assortment of “New Old Stock” Wm. Whitehouse hammers, once made at the Atlas Forge just up the road in DSCF1923Sheffield.

I bagged a lovely 2lb Blocking hammer, a raising hammer and a cross pein hammer of unknown purpose which will be very useful for stretching flanges.  All they needed to bring them up to scratch was an hour with a Scotchbright pad and a can of WD40.

I can’t wait to bash stuff!

Progress on the engine cover has been steady over the last week or so.  After modifying my Sealey metal folder I was hopeful of a pretty good result with bending the flanges on my nicely wheeled panel and it did a fair job.  Far more precise and uniform than was possible before my modifications but in all honesty still not as crisp as the edges on the original.  I tried a number of things to crisp them up before making a doohickey especially for the purpose.

The simple device I made, by cutting a slot in a square drift allows me to hammer down on the edge of the flange to drive into the corner whilst at the same time preventing the flange from distorting.  The slot is a couple of millimetres shorter than the flange, thus ensuring I don’t damage the face.  Used alternately with a slapper & dolly on the side of the flange I smartened up the angle pretty well.  It might need a bit more work when I try fitting it but we’ll see…  A little shrinking of the edges produced the right profile to the panel and it started to look pretty good.  Of course this brought me to just the point in the production process where you can really balls it up.

The handle passes through the skin with a shouldered hole. The aperture is 29mm but the shoulder is a couple of mill deep so the hole size needed to be 25mm.  I own one hole punch…it’s 30mm.  After a brief period of swearing and stamping my foot I realised that the punch had a nice taper on the back edge that might prove useful after all.  A test piece confirmed that it was spot-on for starting the shoulder!  After carefully transposing the position from my paper template I drilled and used the punch to create a witness mark.  A step drill and die grinder soon roughed out the hole and after hand finishing with a file I ran the punch again with an improvised flaring attachment.

After a whizz round with the aviation shears… A pretty passable engine cover skin.  Now if only I had something to attach it to.

I’ve found myself considering a career change following the weekend’s endeavours.  After fitting a new headlamp bulb in the Mother in Law’s Volvo V70 it appears I’m now a fully qualified Gynaecologist.

The stupidity of car designers is quite staggering.  I’m not simply talking about the physical packaging of what is essentially a much more complex piece of machinery than “When I were a lad”.  I own an Integrale for Christ’s sake, I know a thing or two about not being able to get a fag paper between the contents of the engine bay.  But for all the hardware of six consecutive World Rally Championships shoehorned into a family hatchback it is still serviceable.  What really rankles is the poor design of the components and sub components used in modern cars.

I’m not harbouring the same ire as I’ve always held for French cars.  After all, I remember the range of Renaults from the late 80’s/early 90’s that you COULD fit a clutch in without removing the entire engine and transmission as the manual instructed. But there was one bell housing bolt that you could remove with the engine in situ but simply could never replace!  Those hideous creations were the result of Design by Committee in a state owned megalith.  They couldn’t give a flying **** if anyone would ever be able to service their cars.  They were appallingly inept designs with not a single redeeming feature but French nationalism (and taxpayers) would keep them in a job for life.

The situation with the modern Volvo and probably most other modern cars is different.  I don’t believe it born of belligerence but of ignorance.  The way engineers work in this digital age, the ability to create a 3D rendering in Solidworks or AutoDesk Inventor and “virtually” assemble them is revolutionary.  But I can’t help feeling that it has resulted in a disconnect between designers and the real-life functionality of their creations.  The designer of that headlamp cluster can surely never have held a spanner and nobody ever skins their knuckles on a computer simulation.

I used to know a retired Gynaecologist. He went back part-time to keep his hand in.

I said there was a whole other story in it and here it is….

To make the 3 foot window sections I made recently I bought a larger metal folder.  O.K. right from the outset let me say I wasn’t expecting much.  The Sealey DF910 is a cheaply made import from China.  It states on the specification that it’s maximum working thickness is 22 gauge and I was always intending to use it for 20 gauge, so I was expecting to have to do a bit of modification.  As it happens the courier who delivered it beat me to it.  Talk about express delivery, I think they threw it from the back of the van as they drove past at 60 mph!  I had to weld bits back on and straighten bits and god knows what else.

Anywho!  The main fault with it for my purposes was the quality of the top clamp, which frankly would have struggled with 22 gauge.  There were few welds holding it all together because they clearly didn’t want it to warp with the heat, so they smoothed it out with filler and painted over the cracks.  And the clamping bolt holes were not in line.  The net result was a bend that was pretty sharp at one end, pretty round at the other and wherever the hell it liked in the middle.

I too wanted to avoid welding directly on the clamping surface, so decided on an adjustable brace on the triangulating element of the top beam.  The angle of incident would provide additional strength vertically and horizontally, both directions in which the beam bends under load.   I fashioned a brace out of black steel bar and an adjuster out of a nut & bolt and a piece of steel tube.  This modification provides a lot of resistance to the distortion the bar exhibited when under pressure and greatly increases the clamping load at the centre.  Finally I put a spot of weld in the bolt hole to relocate it in line with the other end.  I should have a nice even bend along the full length of the panel now.  Not bad for a cheap tool that I can still fold away against the wall when not in use.

It’s been a busy weekend.  In addition to fitting a new inlet valve mechanism in Nanny’s toilet and replacing a leaking radiator valve in the Mother in Laws central heating system, I’ve even done a bit of metal shaping.

I have a spare engine bay cover for the Amigo and I’m making a new skin for it as a prelude to replacing the skin on my original.  Once the original is restored I’ll sell the spare one.  I thought it would be a quick win job, a bit of a morale boost.  How wrong was I.

The skin is essentially a flat panel.  Of course there is no such thing as a flat panel on a car.  Even a panel that looks ostensibly flat has to have a shallow crown or it will look like an oil can once it has a shiny coat of paint on it.  Somewhat counter intuitively, a shallow crown is probably harder to produce than a lot of shape.  A flat panel is really not forgiving of a slight irregularity.

After creating a paper template from the existing panel and cutting a blank, I put my shallowest anvil into the E-wheel and started to gently work the piece.  Unfortunately, working it on my own proved to be a mistake.  Unable to support the full length of the piece on my own the panels own weight caused uneven stretching, quickly rendering it a failure.  Piece number two was more successful.  With Jules assisting and a much more methodical approach the right crown was painstakingly achieved.  The time consuming exercise was a real eye opener and has made me up my game with the wheel.  A dot punch through the paper template allowed me to transfer all of my dimensions onto the panel and I then punched out a hole at each corner and snipped out the flash between what will become flanges.  Folding those flanges over is going to be a story all on it’s own!

I’ve got a LOT of leave to use up at work, so today I had a day off and got the 500 serviced.  The service interval is supposed to be 18k miles.  With the nature of my daily commute the DPF recharge cycle means the oil service light usually comes on at about 12k.  You can tell when it’s due because it begins to sound a little bit like a diesel and smell like one too!  I’ve been a bit premature this year, with about another month before I’d expect the oil service warning but for the last two years I’ve been out there in sub-zero temperatures, servicing it at the end of December/beginning of January.  So I figured what the hell I’d do it now, between rainstorms of biblical proportions.  Oh for the temperate climate of jolly old Blighty!

The service was straight forward, as I’ve come to expect from the little gem.  Nothing untoward to report, with little to no wear and tear apparent.  Even the brake pads still look like new.  I suppose I should use them more but the damn things slow you down.

However, I did find time to tackle a niggle that has really bugged me for the last 6 months or so.  The little 1248cc Diesel runs like a sewing machine, very civilised for an oil burner.  But for the last six months it’s sounded like a tractor at idle.  If you lay a hand on the air filter usual decorum is restored.  The culprit being wear in the rubber grommets used to mount the filter.  It’s not just an annoying noise, the air flow meter is mounted in the filter housing and all that vibration can’t be good for it. I’ve resolved the problem for now with a bit of heat shrink sleeving and I’ll order some new grommets for the next service.  I also found that the air filter housing was being distorted by the filter when fitting. I had to poke the filter into the gap between lid and housing to ensure the centre hinge was playing along.

But hell, if that’s my biggest gripe with the car, I suppose I can’t complain.

This slideshow requires JavaScript.

Things have been uncharacteristically quiet around The Scuderia recently.  I’ve had a few distractions that derailed my plans for a while.

I spent a few weeks chasing a new property with great workshop facilities but that came to nought.  So after much grumbling and feeling sorry for myself I’m resigned to soldiering on where I am.  It’s far from ideal but at least it won’t put me in the Workhouse.

After pulling myself together but before I could get back to work, I succumbed to the dreaded Fresher’s Flu.  One of the pitfalls of working at a University is that every year thousands of new students arrive from all over the world to pour all their varied and assorted strains of “The Dreaded Lurgy” into a melting pot, to be liberally distributed amongst people who have not yet had opportunity to build immunity to their particular brand of unclean.  The fever has subsided but the cough and runny nose persists but onward I must go.

I have a lot to get on with too.  I’ve got some woodworking to do to help a friend out.  There are five cars outside that all need a service.  I’ve got plenty of work to do on my project cars.  And I’ve decided to make some panels to sell too.

Watch this space!

I’ve had a few lazy days recently. Partly to give the neighbours a break but also to have a rest myself.  Work has been hectic and with all my extra curricular activities I’m about fried.

At times like this a friend in need is, as the old saying goes, a bloody nuisance.  Except this friend was Will and he did come to my rescue when I needed an old road spring to make the MKI Lipper.  What goes around comes around, so I was more than happy to have a bash at the job he brought me the other day.

Will is in to rowing and had a problem with one of the rowing clubs boats.  The oar supports had broken.  I can hear you shouting “ROLLOCKS!”, but really they were broken.

I’ve got an AC TIG welder but I’ve never used it in anger on aluminium, so I was keen to try it out.  It was an interesting exercise through which I learned a lot.

I had to grind a deep groove along the crack and build it back up with filler rod.  It took a lot more heat than I was expecting too!  I’ve done a little gas welding on thin aluminium, so fortunately I was expecting the point between “weld pool” and “puddle on the floor” to be a close one. So it wasn’t as pretty as I hoped but at least I didn’t bugger it completely.

This slideshow requires JavaScript.

Once I ground it all back to shape I re-drilled the holes with a washer to keep them on centre and overall it looked pretty convincing.  So…lightweight E-Type next then?